WooCommerce is one of the best tools to build online stores – it is super-flexible, cost-effective, and easy to manage even for beginners. WooCommerce is a free e-commerce plugin for WordPress, and it transform your website into a fully functioning online store, complete with all the necessary e-commerce features. (You can check-out our previous article for more details about WooCommerce).
If you want to start an e-commerce business using WooCommerce and need an easy-to-follow WooCommerce tutorial, then you are in the right place. In this article, we will show you how to start an online store using WooCommerce in 4 easy steps:
Step 1: Set Up Domain and Hosting for Your Store
There are two things you must deal with before you start working with WordPress and WooCommerce: a domain name and a web hosting service. These two are the most basic prerequisites for building any kind of website.
The name that displays on your website URL is your e-commerce store’s domain name. When customers want to reach your online store, they will type this address into their web browser. Our advice is, try to choose a recognizable domain name which is short and easy to remember.
Web hosting is your storage space on the internet where your website files are stored. Please remember that (since WooCommerce plugin only available for WordPress) you will need a service that offers web hosting for websites built on WordPress.
When choosing a web hosting service, it’s worth paying special attention to the costs, security, customer support, and capabilities of the server. Your website needs to be fast and safe and that’s only possible with a good website hosting. There are so many different WordPress hosting providers available, such as Bluehost, HostGator, GoDaddy, Dream Host, etc.
After this, you will just need to install WordPress and connect it to your domain name. Installing WordPress isn’t a tough job since many hosting providers allow you to leverage one-click installation.
And voila, you are the proud owner of your own website!
Step 2: Install WooCommerce
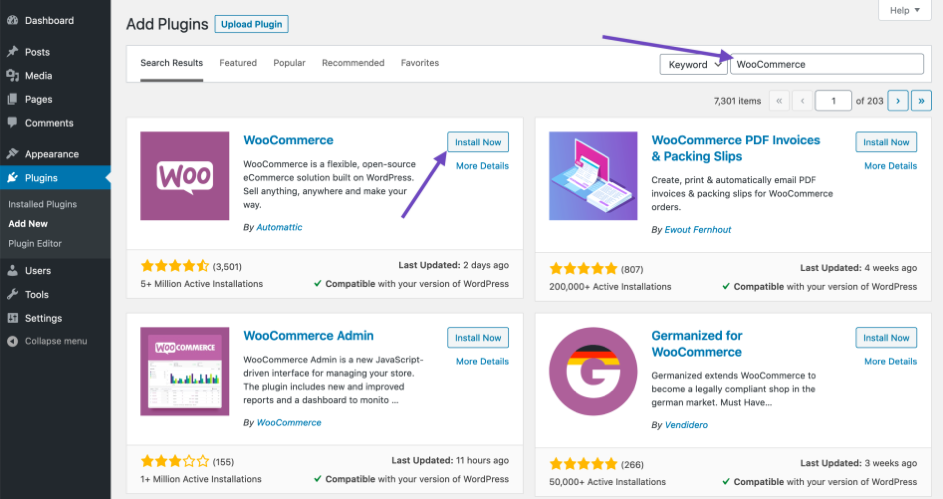
Your website is active, you can now install WooCommerce to transform your website into an e-commerce site. WooCommerce is a WordPress plugin, so the installation process is like any other WordPress plugin. In your WordPress admin panel go to “Plugins” tab, select “Add New”. Then search for “WooCommerce”. WordPress will now show you “WooCommerce” plugin on top. After you find it, you need to click on the “Install Now” button. It can take a few moments to install. Then, there will be a new button called “Activate”, click this button. Now, WooCommerce is successfully installed on your website.
Right after installing it, a setup wizard will appear, and you must walk through all the steps one by one. You need to go through the basic, mandatory settings such as the location and currency of the store, shipping, taxes and payments, as well as the settings recommended by WooCommerce.
- Store Details: you provide the location of your store.
- Industry: you can select in which industry or industries your store operates (Fashion, Health & Beauty, Home, Furniture & Garden, etc.)
- Product Types: which product types you plan to sell in your store (Physical products, subscriptions, memberships, bookings, downloads, etc.)
- Business Details: you can provide more information about your business.
- Theme: You can choose a theme for your online store. You don’t have to do this step right away; you can install later. (Actually, it would be better to choose a theme after adding some products, this way you can see a preview of what your site will look like when you try out a theme).
Please note that above are the basic information you need to give when you start configuring. After finalizing basic steps (including product creation and setting up theme) you also must set up shipping, tax, payments, marketing tools and store management.
Step 3: Add Products to Your WooCommerce Store
Once you finish the WooCommerce setup, you can easily add products to your online store. You can add products manually, import, or migrate. But since you are starting fresh, we recommend adding products manually.
To add products, navigate to “Products” and click on “Add New” to add a new product.
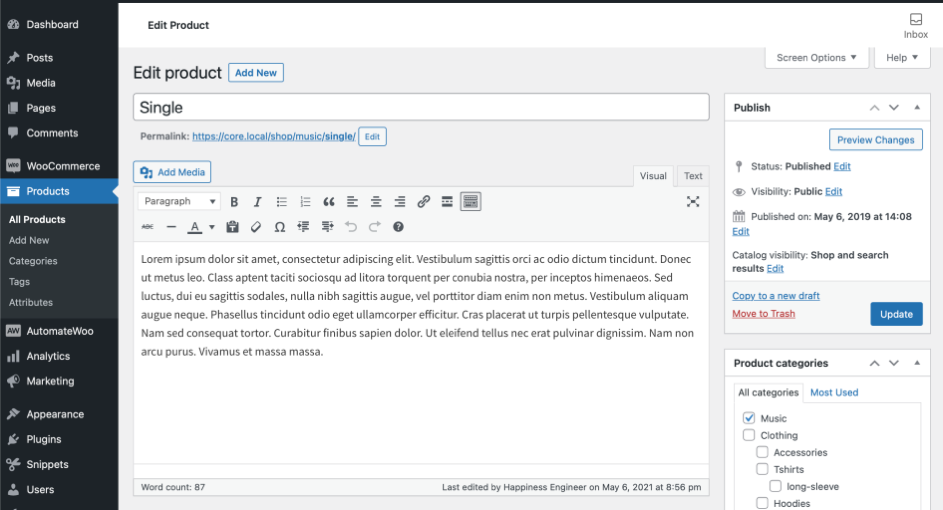
- Enter the name of the product in title section. Then, you need to add a long description that explains the features and benefits of the product. When describing a product be sure to describe it in as much detail as possible.
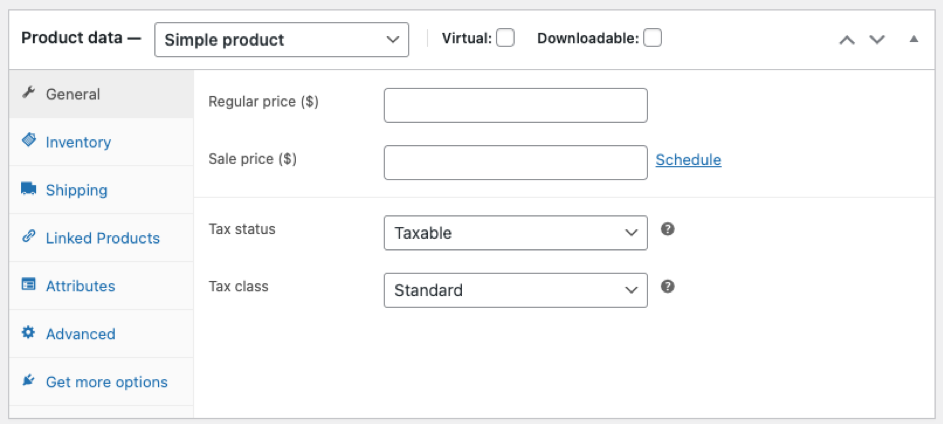
- After that scroll down to the Product data box. The Product Data box is where most of the important data is added for your products. You can add regular price and sale price, tax, set up inventory, shipping, linked products, etc. from this option.
- Then, you can set up categories and tags. Product categories and tags work same as WordPress categories and tags work.
- Nothing makes a product page more useful than product images. Adding product images and galleries are options available on the right-hand side when adding or editing a product in your store from WooCommerce > Products.
- Finally, you can click on the ‘Publish’ button at the top right box on the screen to publish your product.
It is very important that you fill in all product data elaborately. Customers appreciate the completeness of the information and are more willing to purchase products about which they can learn as much as possible.
It is very important that you fill in all product data elaborately. Customers appreciate the completeness of the information and are more willing to purchase products about which they can learn as much as possible.
Step 4: Customize Your Theme
Now that your e-commerce site is configured, you can concentrate on the visual aspect. There are thousands of online stores competing to sell similar products. In such a competitive environment, it is very important for your website to stand out visually to attract customers’ attention. This is why you need to choose your website theme – which decides the layout and design of your e-commerce – carefully.
There are many themes, both free and paid, that are available for WordPress. But there are also several themes optimized for use with WooCommerce, which are perfectly adapted for use with e-commerce websites.
On their website, WooCommerce recommends Storefront and its child themes because they are built and optimized for WooCommerce. Storefront is free. If you wish to add functionality, you can purchase Storefront extensions. If Storefront isn’t for you, there are lots of other themes that work great with WooCommerce.
When choosing a theme for your website, you should pay attention to the following:
- Only download themes from WordPress themes directory or reliable theme shops.
- Always check reviews, ratings, and number of downloads.
- Try to choose a design as simple and clean as possible.
- Since most of the customers access the internet from their mobile phones, don’t forget to test your selected theme on mobile phone, tablet, etc.