Use Case: CRM Integration
In other posts, we discussed about customer onboarding process which includes welcome email and CRM automation and we already implemented Welcome email scenario. Now let’s see how you can implement CRM integration with Herogi.
Scenarios
Scenarios are fundamental part of Herogi. Basically a scenario group of states which are connected to each other with events. You can find more about it in our user guide.
In first part of these series we decided to have generic register events to trigger our scenarios so we’ll keep using same event (register).
CRM Scenario
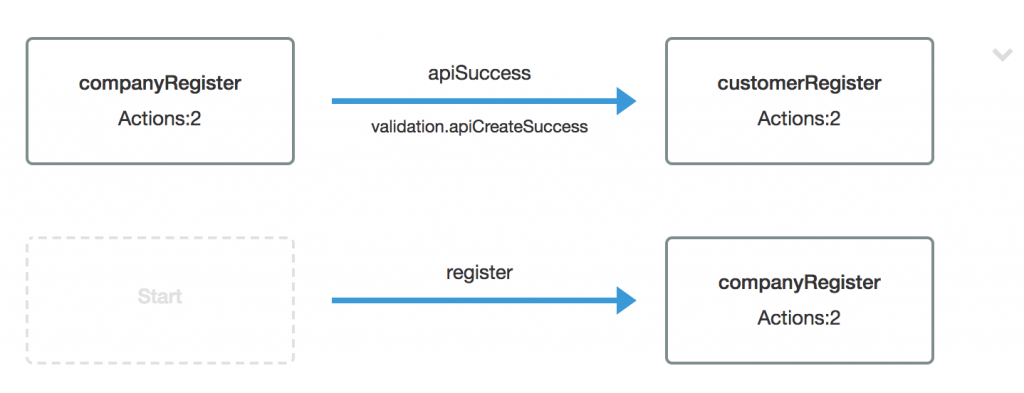
The purpose of this scenario is whenever a new customer registers on our service, we want to create an account also on Hubspot so our sales developers can convert this potential lead into a successful customer. The flow of scenario looks like this;
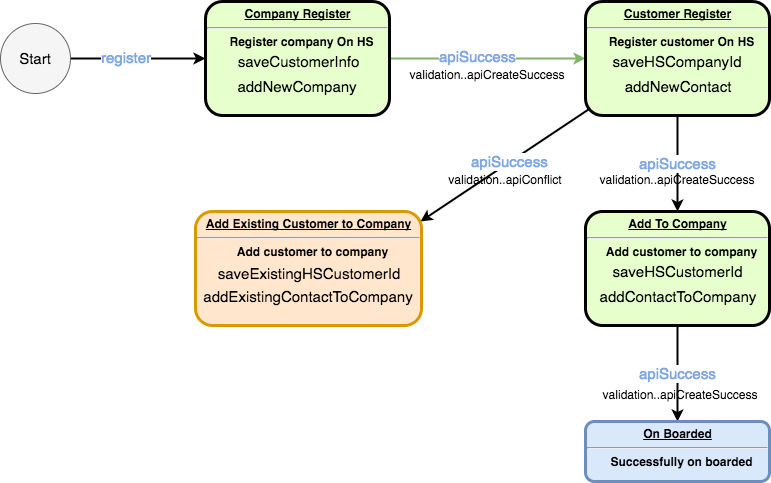
As you see this scenario is a little bit more complex than previous “Welcome email”. Before explaining each states in more detail, I want to give a brief about how Hubspot works. Hubspot has a restful api to create contacts, companies and relate these entities with each other. Each of these entities have key/value properties you can set like name, email, address and etc. We’ll use create company and create contact end points to achieve integration. For more information you can check their api documentations.
Steps;
1. Register customer’s company on Hubspot
2. If 1st step is successful, register customer itself on Hubspot
3. If 2nd step is successful, add customer as contact in company created on step 1st.
4. If 2nd step is failed with customer already registered, parse customer id and add customer as contact in company.
5. If 3rd step is successful, do nothing move to successful onboarded state.
Events
If you check scenario design, you’ll see that we need two events.
First one is the register which is same as in “welcome email” scenario.
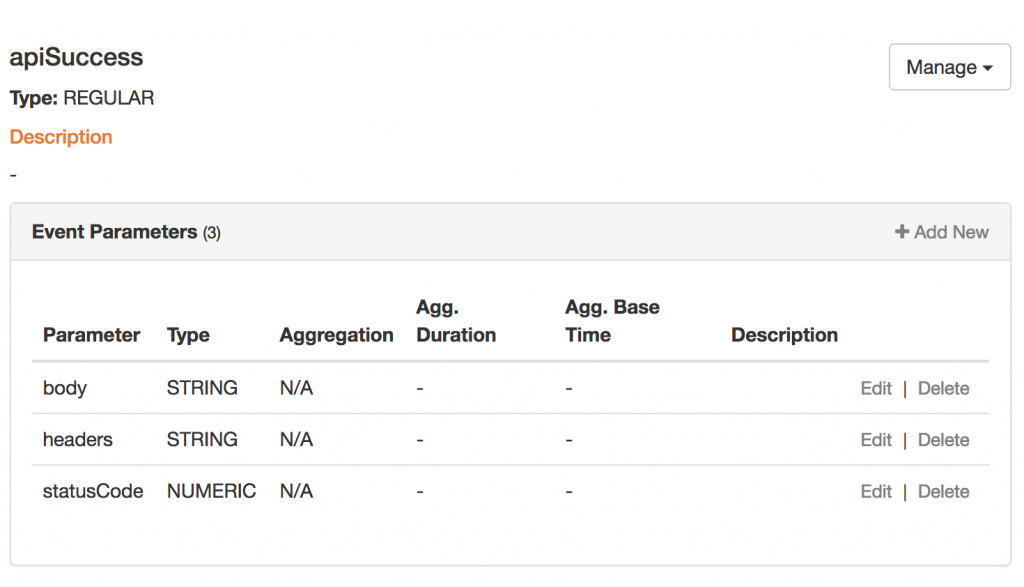
Second one is the new apiSuccess. Now things get start interesting. If you use one of our http actions, these actions can send events which include http response for the request. So you can build http pipelines easily. In this context apiSuccess has three parameters statusCode, headers and body. We’ll use it in our actions to understand response coming from Hubspot.
State 1st – Company Register
This is our first state when our customers register, our scenario will get register event and will start working for that customer. In this state we want to register customer’s company on Hubspot and then if this operation completes successfuly, move to the next state and register customer herself as contact.
Actions
Action – addNewCompany
It’s a http post action which is calling Hubspot’s company create endpoint.
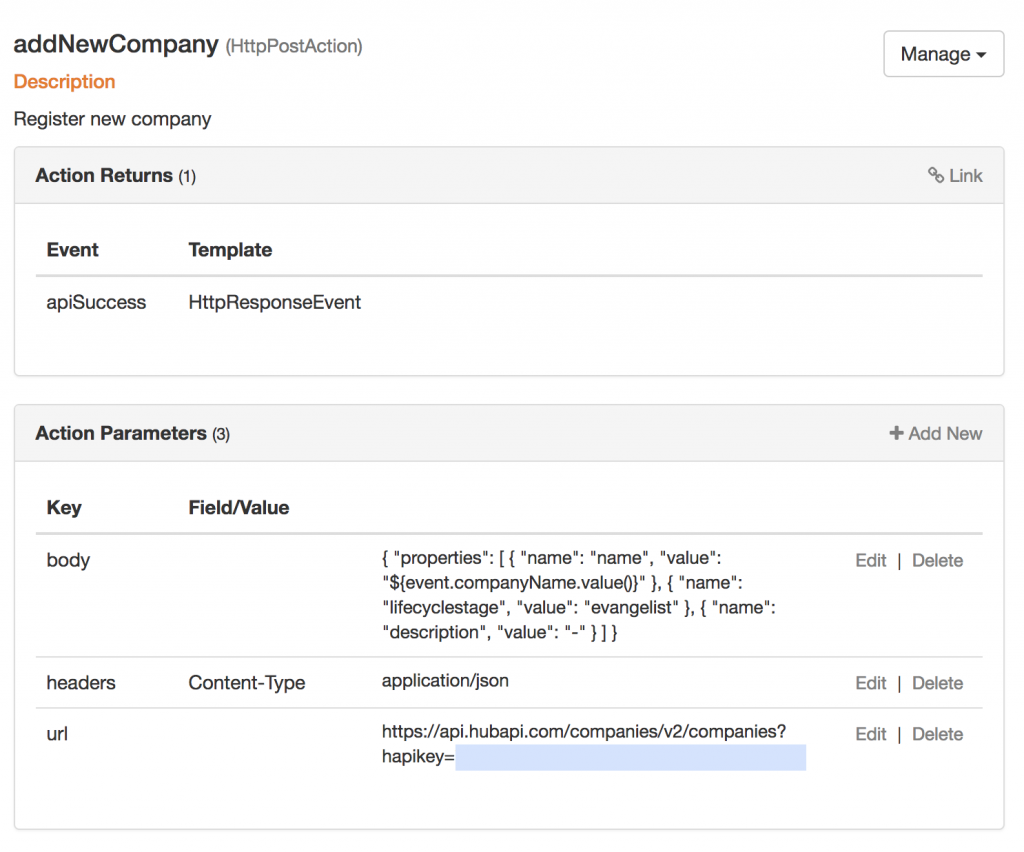
We linked our apiSuccess as returning event. In this way once this action ran, it’ll generate apiSuccess. Rest is pretty straight forward we set request body, url and headers.
Action – saveCustomerInfo
So far we just created company on Hubspot but we need rest of the customer information like email, contact name to create customer entity once we’re in next state. To achieve it we need to save this informations. Herogi supports “session” data. You can create as much as sessions in your scenario and use these in any state in the same scenario. You can read more about it in our user guide.

saveCustomerInfo is a instance of simple key/value store action, build-in action type that helps you to store any value in sessions.

You can see that we create json string from our event data and stored it in session customerData
Transition To Next State
Our transition event is apiSuccess. But we also have a validation on that event which is checking status code from Hubspot is 200 (success).
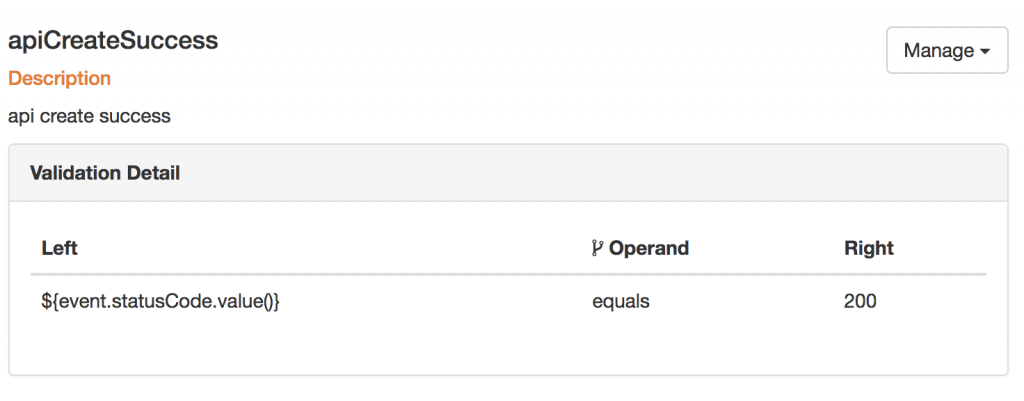
If we get apiSuccess event and status code is 200, user will move from “Company Register” to “Customer Register” state. We didn’t handle else case, so if that happens (means Hubspot is down), our user will stay in that state.
State 2nd – Customer Register
We registered our customer’s company on Hubspot in previous state, now we can register our customer on Hubspot as contact.
Actions
Action – addNewContact
It’s a which is calling Hubspot’s contact create endpoint.
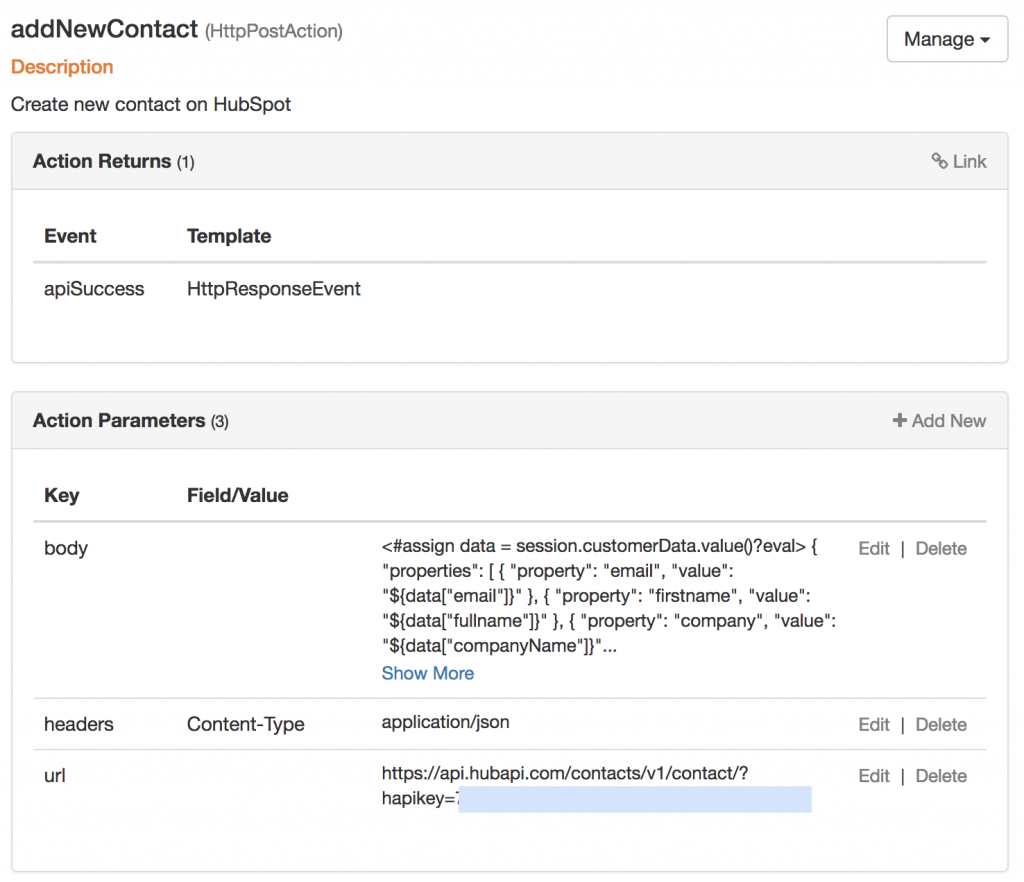
We again linked our apiSuccess as returning event. I want to show you how body looks like, because we’re using session informations stored in customerData which is interesting
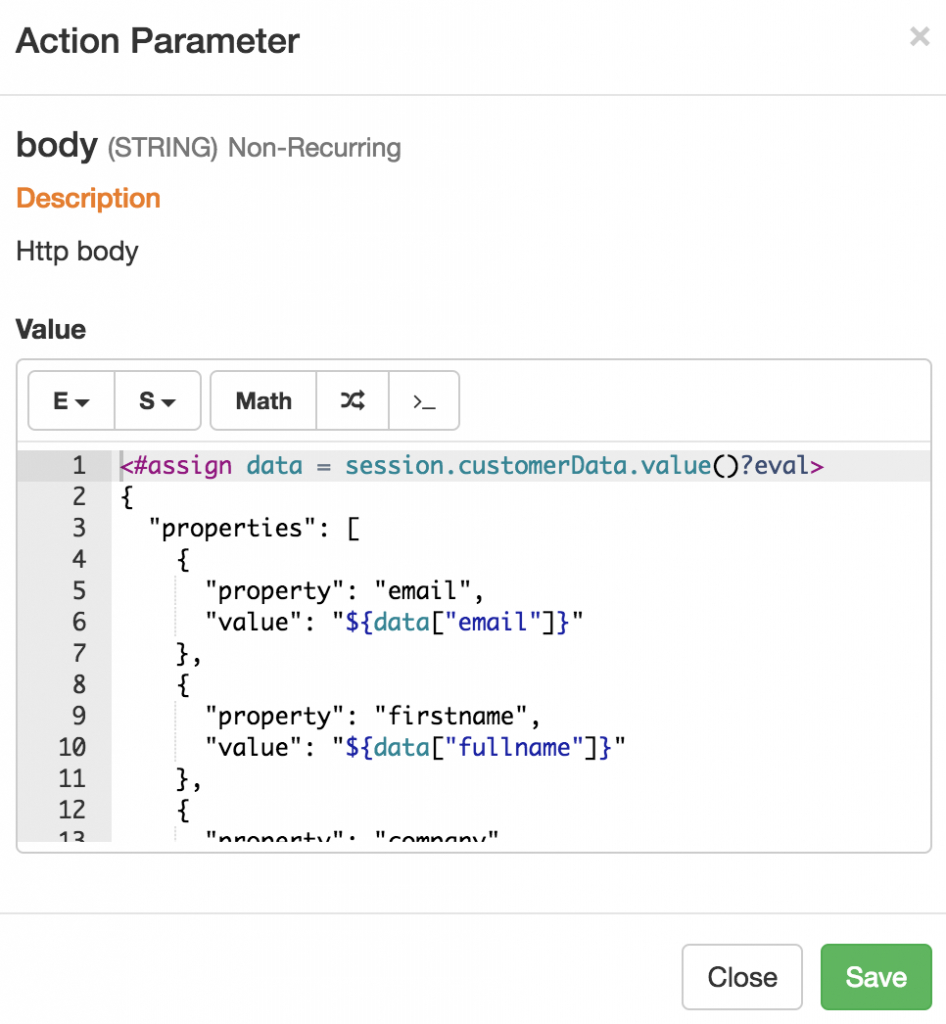
Dynamic scripting support make it easy to parse and use session data as json in context.
Action – saveHSCompanyId
It’s another simple key/value store action. When state change triggered by apiSuccess, we get company id created on Hubspot in that event. We want to store it to use in next state. Because relating contact and company requires the company id which is provided in request. Otherwise Hubspot will see contact and company as independent entities.
First we need to create session data to store company id.

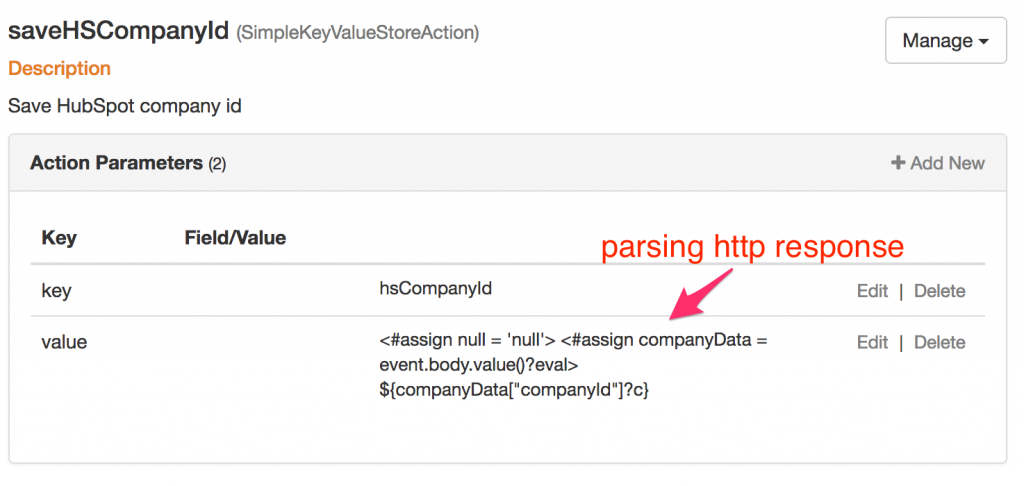
Lets have closer look to our action. Our event is apiSuccess which has body field. We are parsing that body as json and extracting company id to store in our session.
Transition To Next State
Our transition event is again apiSuccess. But we also have a validation on that event which is checking status code from Hubspot whether it is 200 or 409. 200 means success, meanwhile 409 means conflict (Hubspot uses email as primary key so if email already exist as different contact, it’ll generate conflict error).
We handle validation results differently, depends on the status code user can transferred to 3rd – Add to company, or 4rd – Add existing contact to company state.


Summary
There are two additional states, which almost same as the states we discussed but they mostly used for adding contact to company. For the sake of shorter post, We’ll skip it.
We’re using similar scenario in Herogi. In addition to existing events, we also introduced customer update event. If customer changes information on Herogi, like adding website, phone number, address information or updating email, company name and etc we also sync back to Hubspot with that update event.
Result
If you’re wondering how it looks like on Hubspot, here it’s;
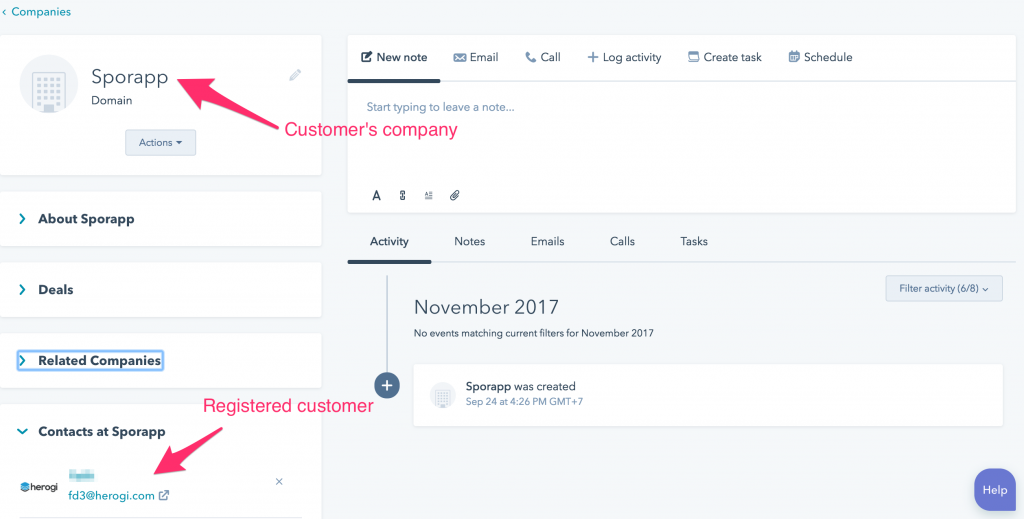
If you have further questions about this scenario or more generally about Herogi, you can contact with us. We’re more than happy to help you.